User Manual Frigidaire FLCE7522AW Electric Washer/Dryer Laundry Center - 3.9 Cu. Ft Washer and 5.5 Cu. Ft. Dryer

NOTE: Because of potentially inconsistent voltage capabilities, the use of this dryer with power created by gas powered generators, solar powered generators, wind powered generators or any other generator other than the local utility company is not recommended.
Electrical requirements for laundry center with electric dryer
- CIRCUIT - Individual 30 amp. branch circuit fused with 30 amp. time delay fuses or circuit breakers.
- POWER SUPPLY - 3-wire or 4-wire, 240 volt, single phase, 60 Hz, Alternating Current.
- OUTLET RECEPTACLE - NEMA 10-30R or NEMA 14-30R receptacle to be located so the power supply cord is accessible when the dryer is in the installed position.
- GROUNDING CONNECTION - See “Grounding requirements” in Electrical Installation section.
3-Wire power supply cord kit (not supplied)

The dryer MUST employ a 3-conductor power supply cord NEMA 10-30 type SRDT rated at 240 volt AC minimum, 30 amp, with 3 open end spade lug connectors with upturned ends or closed loop connectors and marked for use with clothes dryers. For 3-wire cord connection instructions see ELECTRICAL CONNECTIONS FOR A 3-WIRE SYSTEM
4-Wire power supply cord kit (not supplied)

The dryer MUST employ a 4-conductor power supply cord NEMA 14-30 type SRDT or DRT (as required) rated at 240 volt AC minimum, 30 amp, with 4 open end spade lug connectors with upturned ends or closed loop connectors and marked for use with clothes dryers. For 4-wire cord connection instructions see ELECTRICAL CONNECTIONS FOR A 4-WIRE SYSTEM.
Electrical requirements for laundry center with gas dryer
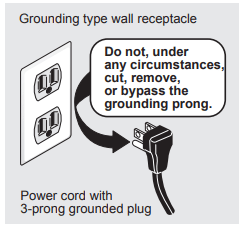
WARNING: Improper grounding of the laundry center may cause serious injury or death. Check with a licensed electrician if you are in doubt as to whether the appliance is properly grounded.


- CIRCUIT - Individual, properly polarized and grounded 15 amp. branch circuit fused with 15 amp. time delay fuse or circuit breaker.
- POWER SUPPLY - 2-wire, with ground, volt, single phase, 60 Hz, Alternating Current.
- POWER SUPPLY CORD - The dryer is equipped with a 120 volt 3-wire power cord.
- GROUNDING CONNECTION - See Grounding requirements” in Electrical.
Gas supply requirements
WARNING: Uncoated copper tubing will corrode when subjected to natural gas, causing gas leaks. Use ONLY black iron, stainless steel, or plastic-coated brass piping for gas supply.
- . Installation MUST conform with local codes, or in the absence of local codes, with the National Fuel Gas Code, ANSI Z223.1 (latest edition).
- The gas supply line should be 1/2 inch (1.27 cm) pipe.
- If codes allow, flexible metal tubing may be used to connect your dryer to the gas supply line. The tubing MUST be constructed of stainless steel or plastic-coated brass.
- The gas supply line MUST have an individual shutoff valve installed in accordance with the B149.1, Natural Gas and Propane Installation Code.
- A 1/8 inch (0.32 cm) N.P.T. plugged tapping, accessible for test gauge connection, MUST be installed immediately upstream of the gas supply connection to the dryer.
- The dryer MUST be disconnected from the gas supply piping system during any pressure testing of the gas supply piping system at test pressures in excess of 1/2 psig (3.45 kPa).
- The dryer MUST be isolated from the gas supply piping system during any pressure testing of the gas supply piping system at test pressures equal to or less than 1/2 psig (3.45 kPa).
- Connections for the gas supply must comply with the Standard for Connectors for Gas Appliances, ANSI Z21.24 - CSA 6.10.
Water supply requirements
Hot and cold water faucets MUST be installed within 42 inches (107 cm) of your washer’s water inlet. The faucets MUST be 3/4 inch (1.9 cm) with threading for laundry hose connection. Water pressure MUST be between 10 psi (0.69 bars) and psi (8.27 bars). Pressure difference between hot and cold cannot be more than 10 psi. Your water department can advise you of your water pressure.
Drain system requirements
- Drain capable of eliminating 17 gals (64.3 L) per minute.
- A standpipe diameter of 1-1/4 in. (3.18 cm) minimum.
- Standpipe height above the floor should be: Minimum height: 33 in. (84 cm) Maximum height: 96 in. (244 cm)
NOTE: For installations requiring a longer drain hose, have a qualified technician install a longer drain hose (according to your model number) available from an authorized parts distributor. For drain systems in the floor, install a syphon break kit available from your local hardware store.


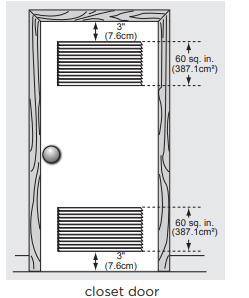
Installation in a recess or closet
- A dryer installed in a bedroom, bathroom, recess or closet, MUST be exhausted outdoors.
- No other fuel burning appliance shall be installed in the same closet as the gas dryer.
- Your dryer needs the space around it for proper ventilation.
- DO NOT install your dryer in a closet with a solid door.
- Closet door ventilation required: A minimum of 120 square inches (774.2 cm2) of opening, equally divided at the top and bottom of the door, is required. Openings should be located 3 inches (7.6 cm) from bottom and top of door. Openings are required to be unobstructed when a door is installed. A louvered door with equivalent air openings for the full length of the door is acceptable.
Laundry center dimensions


- Power supply cord length on gas unit approximately 60 inches (152.5 cm).
- Loose drain hose length beyond clamp approximately 51.5 inches (131 cm)
INSTALLATION

Unpacking instructions
IMPORTANT: To prevent vibration, possible machine damage and maximize performance, the following steps must be completed.
1. If foam tub block has been removed, reinsert it now and tape the lid securely.

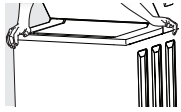
2. Carefully cut the front and back corners of the left side of the remaining cardboard.

3. With help from a second person, carefully tip the laundry center slightly to the left as shown in the picture below. Remove the foam shipping support from the base of the unit. Save packaging foam for future use.
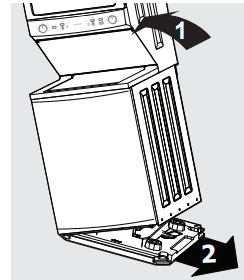

4. Carefully lower the laundry center to an upright position and remove the tape holding the lid shut. Remove the foam tub block, all foam inserts, and other tub contents.
NOTE: If the laundry center is to be transported at a later date, the tub blocking pad, foam base and tub support should be retained.

5. From the back of the washer, remove the wire shipping clips securing the drain hose.
6. DO NOT remove the PLASTIC CLIPS which secure the drain hose to the right side of the washer back sheet. It helps form a standpipe to prevent water siphoning.


7. Carefully move the laundry center to within four (4) feet of the final location for the start of the installation.
Connecting the gas
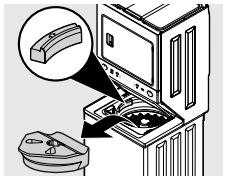
1. Remove the shipping cap from gas pipe at the rear of the dryer.
IMPORTANT: DO NOT connect the dryer to L.P. gas service without converting the gas valve. An L.P. conversion kit must be installed by a qualified gas technician.
2. Connect a 1/2 inch (1.27 cm) I.D. semi-rigid or approved pipe from gas supply line to the 3/8 inch (0.96 cm) pipe located on the back of the dryer. Use a 1/2 inch to 3/8 inch (1.27 cm to 0.96 cm) reducer for the connection. Apply an approved thread sealer that is resistant to the corrosive action of liquefied gases on all pipe connections.
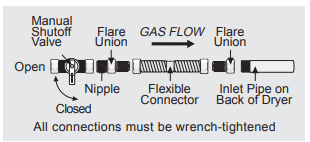
IMPORTANT: The supply line must be equipped with an approved manual shutoff valve. This valve should be located in the same room as the dryer and should be in a location that allows ease of opening and closing. DO NOT block access to the gas shutoff valve.
3. Open the shutoff valve in the gas supply line to allow gas to flow through the pipe. Wait a few minutes for gas to move through the gas line.
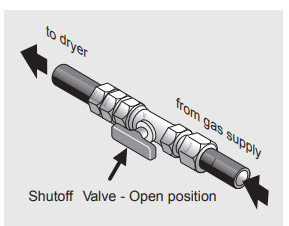
4. Check for gas system leaks with a manometer. If a manometer is not available, test all connections by brushing on a soapy water solution.
Leveling the laundry center
Excessive noise and vibration can be prevented by properly leveling the laundry center.
- With the laundry center within 4 feet (1 m) of its final location, place a level on top of the washer lid.

- Use adjustable pliers to adjust the leveling legs so the laundry center is level frontto-rear and side-to-side, and stable corner-tocorner.

- Press down on alternate corners and sides and feel for the slightest movement. Adjust the appropriate leg(s) so the laundry center sits solidly on the floor on ALL four legs. Keep the leveling leg extension at a minimum for best performance of the washer.
Connecting the water
- Run some water from the hot and cold faucets to flush the water lines and remove particles that might clog the water valve screens and to determine which faucet is hot and which is cold supply

- Check to ensure that the inlet hoses have the rubber washer firmly in place. Use only new hoses.
- Connect the HOT inlet hose to the HOT inlet connection on the washer and the COLD inlet hose to the COLD inlet connection on the washer (cold on top). Tighten by hand until snug. Then tighten each supply connection another 2/3 turn with pliers. DO NOT cross thread or over-tighten these connections.
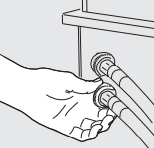
- Connect the HOT inlet hose to the HOT water supply and the COLD inlet hose to the COLD water supply. Tighten by hand until snug.
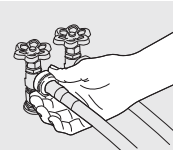
- Tighten each supply connection another 2/3 turn with pliers. DO NOT bend, kink, or pinch water inlet hoses.
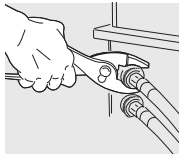
- Turn on the water and check for leaks.
Connecting the exhaust
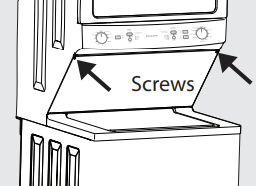
1. Remove the two screws securing the dryer front access panel to the dryer cabinet. Lift the panel until the tabs can be disengaged from the cabinet, remove the panel and set aside.
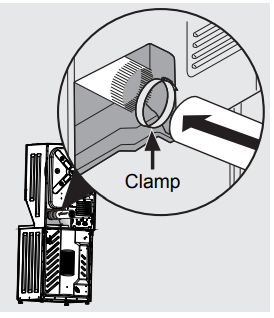
2. Connect the exhaust duct to the outside exhaust system. Use of a 4” (10.2 cm) clamp is recommended to connect the dryer to the exhaust vent system. Use metal foil tape to seal all other joints.
3. Reinstall the dryer front access panel.
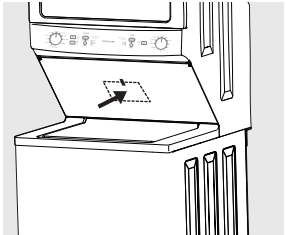
4. Carefully slide the laundry center to its final position. Recheck for level and rock corners for stability.

Connecting the drain
- Form a “U” shape on the end of the drain hose with the hose pointed toward the drain.
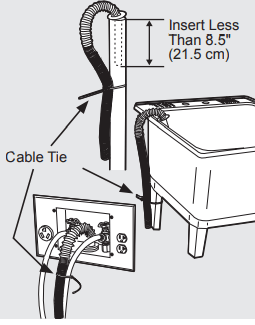
- Place the formed end in a laundry tub or a standpipe and secure the drain hose with the cable tie (provided in the enclosure package) to the standpipe, inlet hose, laundry tub, etc. so the hose does not pull out from the force of the water.
Completing the installation
IMPORTANT: Check to ensure the power is off at a circuit breaker/fuse box before plugging the power cord into an outlet.
1. Plug the power cord into a grounded outlet

WARNING: Improper grounding of the dryer may cause serious injury or death. Check with a licensed electrician if you are in doubt as to whether the appliance is properly grounded.

2. Turn on the power at the circuit breaker/fuse box.
3. Run the washer through a complete cycle, checking for water leaks and proper operation.
4. If you have any questions during initial operation, please review Self Help before calling for service.
5. Place these instructions in a location near the appliance for future reference.
NOTE: A wiring diagram and technical data sheet are located behind the dryer access panel.
WARNING: When discarding or storing your old laundry center, ALWAYS remove the washer and dryer doors.

CONTROLS AND SETTINGS
Washer controls and settings
This manual covers many models and not all cycles, options, or features listed are available on every model. Consoles shown above for reference only. Your model may differ.

Wash cycle selection
Turn the washer cycle selector in either direction to select a washing cycle.

Normal: Select this cycle for normally soiled cottons, linens, towels, shirts, denims, and mixed loads.
Activewear: Select this cycle for small loads of lightweight, synthetic apparel worn for working out, running, swimming, cycling, tennis, and similar activities when removal of light soil and perspiration are important.
Delicates: Select this cycle for lightly soiled knits and delicates which require gentle washing.
Quick Wash: Select this cycle to quickly wash a small, lightly soiled load in 35 minutes.
Soak: Select this cycle to soak heavily soiled and stained items before washing. Cold water is recommended with this cycle as warmer water may set some stains. Use the amount of detergent recommended for a normal wash cycle. If desired, use a bleach or a soaking agent safe for the fabric. The washer will continue on with a soil-loosening wash cycle immediately after the soak phase.
Light Soil: Select this cycle for lightly soiled cottons, linens, towels, shirts, denims, and mixed loads.
Colors: Select this cycle for lightly soiled, dark, or highly dyed fabrics which may be susceptible to dye loss.
Heavy Soil: Select this cycle for heavily soiled cottons, linens, towels, shirts, denims, and mixed loads.
Bulky: Select this cycle for bulky items such as comforters, blankets, mattress pads, sleeping bags, and other similar items.
Wash cycle settings
Wash temp (water temperature)
Press the Wash Temp button to cycle through wash water temperatures until the desired temperature is selected. The LED will light to indicate the current selection. Select a wash water temperature according to fiber content, colorfastness, and soil level. To protect your fabrics, the temperature range of cold to hot settings may be different depending on cycle selected.
The water heater setting, its distance from the washer, water usage in other parts of the home, and seasonally low ground water temperature in some geographic areas can affect water temperature.
Hot: Select this setting for heavily soiled white or colorfast cottons and blends.
Warm: Select this setting for normally soiled white or colorfast cottons or blends.
Cold: Select this setting for lightly soiled non-colorfast items, knits, delicates, and hand washables. Some warm water will automatically blend with cold tap supply to achieve cold.
Water level:
Press the Water Level button to cycle through wash water level until the desired water level is selected. The recommended water level can be determined by the size of the wash load.
MaxFill: Select the MaxFill water level setting if the tub is over one half (1/2) full.
Med (Medium): Select the Medium water level setting if the tub is between one third (1/3) and one half (1/2) full.
Low: Select the Low setting if the tub is one third (1/3) or less full. The Medium and MaxFill settings are also recommended for heavily soiled loads to remove excess dirt and detergent or if household members have sensitive skin.
Washer setting chart
These temperatures and water levels are available with the following cycles

Wash cycle controls (Start, Pause, and Cancel)
Start: Press the washer START|PAUSE button once to begin the wash cycle. The unit will emit two short beeps, the LED will turn solid green, and the door lid lock will engage with an audible double click.
Pause: Press the washer START|PAUSE button once while the washer is running to pause the wash cycle. The unit will emit one short beep, the LED will blink, the wash tub will come to a complete stop, and the door lid safety lock will disengage with an audible double click. The wash tub can take up to 6 minutes to stop after the START|PAUSE button is pressed. DO NOT force open the locked lid. Press the START|PAUSE button again to restart the wash cycle.
Cancel: Press the washer CANCEL button to cancel the wash cycle. The unit will emit one long beep, the wash tub will come to a complete stop, and the door lid safety lock will disengage with an audible double click. The wash tub can take up to 6 minutes to stop after the CANCEL button is pressed. DO NOT force open the locked lid.
Wash cycle indicator lights
The washing cycle indicator lights provide information during the wash cycle.
The Close Washer Lid advisory LED will illuminate if the washer lid is open. Fully close the washer lid before starting the washer. The washer will not operate with the lid open.
The Balance Load advisory LED indicator will illuminate if the wash load is unbalanced in the drum during the wash cycle. Pause the washer and redistribute the wash load.
The Cycle Status Lights will illuminate as each stage of the wash cycle is reached.
Cycle Status Light stages include: Washing, Rinsing, Spinning and Done.
WARNING: To reduce the risk of fire or serious injury to persons or property, comply with the basic warnings listed below:
- Read and comply with all instructions on stain removal products.
- Keep stain removal products in their original labeled containers and out of children’s reach.
- DO NOT combine stain removal products, especially ammonia and chlorine bleach. Dangerous fumes can result.
- Never wash items which have been previously cleaned in, washed in, soaked in or spotted with gasoline, dry cleaning solvents or other flammable or explosive substances because they give off vapors that could ignite or explode.
- Never use highly flammable solvents, such as gasoline, inside the home. Vapors can explode on contact with flames or sparks
WARNING: DO NOT use or mix liquid chlorine bleach with other household chemicals such as toilet cleaners, rust removers, acid or products containing ammonia. These mixtures can produce dangerous fumes which can cause serious injury or death.

Dryer controls and settings
Dry cycle selection
Turn the DRYER cycle selector in either direction to select a drying cycle.
NOTE: To change settings after the cycle starts, press the START|PAUSE button and adjust the setting. Press the START|PAUSE button again to resume the cycle.
Auto dry cycles
Auto Dry cycles take the guesswork out of selecting the correct drying time for each load. With auto dry cycles, the load will automatically be dried at the selected temperature. When the load has neared the end of the drying cycle, it will continue to tumble for a brief cool down period. This helps reduce wrinkling and makes items easier to handle during unloading.
Drying time varies depending on size of load, dampness of load, and fabric type. Available auto dry settings are as follows:
Normal: Select this cycle to dry everyday fabrics including cottons, linens, and sheets.
Bulky: Select this cycle for bulky items such as comforters, blankets, mattress pads, sleeping bags, and other similar items.
Delicates: Select this cycle to dry cottons, blends, and permanent press items with a no-iron finish.
Activewear: Select this specialty cycle to dry lightweight synthetic athletic apparel including stretch fabrics.
Timed dry cycles
WARNING: To avoid fire hazard, DO NOT use heat to dry items containing feathers or down, foam rubber, plastics similarly textured, rubber-like materials. Use the Air Fluff setting.
Quick Dry: Select this timed cycle to quickly dry a small load made up of just a few items. It provides approximately 25 minutes of tumbling including a cool down period.
Timed dry: Select a timed drying cycle for any load using one of the preset cycles of 15, 30, 60, or 90 minutes. The dryer will continue to heat throughout the cycle until the final cool down period.
Air Fluff: Select this cycle for loads that require air drying only. No heat will be used with this setting. This setting should be used for dry items such as items containing feathers, down, foam rubber, plastics, or rubber-like materials; to refresh clothing, stuffed animal, pillows, or blankets; and to dust draperies.
Drying cycle settings
Drying Temperature (Dry Temp)
Select the temperature setting most suitable for each load. To protect your fabrics, not all temperatures are available with every cycle. If an unavailable temperature setting is selected by the user, the nearest available temperature will be substituted.
High: Recommended for durable fabrics and towels.
Normal: Recommended for most cotton fabrics.
See other models: FGS379DQ FFMV1645TM AFFU1766DW FGF318EC LGHS2667KE
Low: Recommended for delicate fabrics.
Drying cycle controls (Start, Pause, and Cancel)
START - Press DRYER START|PAUSE button once to begin the drying cycle. The unit will emit one beep before the drum begins to rotate.
PAUSE - Press DRYER START|PAUSE button while the dryer is running to pause the drying cycle. Opening the door with a cycle running will also pause the cycle. You will hear two beeps. Allow the drum to come to a complete stop before reaching inside. Press the DRYER START|PAUSE button while paused to restart the drying cycle.
CANCEL - Press the DRYER CANCEL button to cancel the drying cycle. Wait for the drum to come to a complete stop before reaching inside
Drying cycle indicator lights
The drying cycle indicator lights provide information during the dry cycle.
The Close Dryer Door advisory LED will illuminate if the dryer door is open. Fully close the dryer door before starting the dryer. The dryer will not operate with the door open.
The Clean Lint LED will illuminate after each drying cycle as a reminder to clean the lint filter. The lint filter must be cleaned after every load. This is NOT a warning of a clogged exhaust duct or filter. Open door or press CANCEL to turn off the LED.
The cycle status lights will illuminate as each stage of the drying cycle is reached. Stages include: Drying, Cooling, and Done.
Dryer Setting Chart
OPERATING INSTRUCTIONS
Operating the washer
1. Sort laundry into loads that can be washed together.
- Sort by recommended cycle and water temperature.
- Separate white, light, and colorfast items from dark and non-colorfast items.
- Separate items that shed lint from items that attract lint.
- Casual, synthetic, knit, and corduroy items will pick up lint from towels, rugs, and bedspreads.
- Separate heavily soiled items from lightly soiled items.
- Separate lacy, sheer, loosely knit, or delicate items from durable items.
- DO NOT machine wash items containing fiberglass. Small particles of fiberglass left in drum may transfer to fabrics in other loads and cause skin irritation and/or damage to fabrics.
- DO NOT wash water-resistant and water-repellent type clothing or other materials
2. Prepare items for washing.
- Empty pockets.
- Brush off lint and dirt. Shake out rugs and beach towels.
- Close zippers, fasten hooks, button buttons, and tie strings/ sashes. Remove non-washable trims and ornaments.
- Place delicate and small items such as bras and hosiery in a mesh bag (not included).
- Mend rips and tears to prevent further damage during washing.
- Turn knit items inside out to prevent pilling.
3. Pretreat stains and heavy soil.
- See Stain Removal Guide for safe, successful stain removal instructions.
4. Add liquid detergent or powder detergent to wash tub BEFORE adding load.
- Detergent packs can also be used but may not fully dissolve in some cycles.
- The amount of detergent required depends on the type of detergent, load size, and water hardness.
- Follow manufacturer’s instructions for recommended amount of detergent.
- Use a low-sudsing, highefficiency detergent to prevent oversudsing.
- Look for the high-efficiency symbol on the detergent label.
5. Add other wash products to wash tub (if desired)
- Water conditioners, detergent boosters, and enzyme products may be added with detergent.
- See product manufactaurer’s instructions.
6. Add bleach (if desired) before adding load.
- If using liquid bleach, add to bleach dispenser located in left front corner under lid. Then add 1 cup (240 ml) water to flush dispenser.
- If using powdered bleach, add directly to the empty tub.
- Follow manufacturer’s instructions for recommended amount of bleach.
- DO NOT use powdered bleach in bleach dispenser.
7. Add laundry load to wash tub.
- Add items one at a time, each tightly bunched into its own ball” to allow beneficial item interaction. Avoid loading items in a flat, laid-out fashion.
- For best washing performance, dry load level should not be higher than the upper row of holes in the wash tub.
- Combine large and small items in a load. Load small items first.
- Large items should not be more than half the total wash load.
- When washing a single heavy item, add 1 or 2 towels to balance the load.
- DO NOT overload the washer.
8. Add liquid fabric softener to the final rinse (if desired).
- Add diluted fabric softener to the final rinse following fabric softener manufacturer’s instructions.
- A fabric softener dispensing ball can also be used.
- To prevent staining, do not pour liquid fabric softener directly on to wash load.
- Use of multi-product detergent plus softener) sheets or color-absorbing sheets NOT recommended. They could damage or disable your machine.
9. Select washing cycle and settings for each load.
- See Washer Cycle Selection and Washer Cycle Settings on the following pages.
- Unit will emit three short beeps to indicate it is in “wake” mode and ready to operate.
- For best results, follow fabric care label on items to be washed.
10. Close the washer lid and start the washer.
- See Washing Cycle Controls (Start, Pause, and Cancel) on the following pages.
- LED will light solid when washer is running.
- Pausing a wash cycle while washer is running may affect performance of the wash cycle.
11. Remove items when the cycle is completed
- For your safety, the lid is locked during the operation of the washer.
- Once cycle has ended, wash tub will come to a complete stop and door lid safety lock will disengage with an audible double click.
- Place washed items in automatic dryer, line dry, or dry flat as directed by fabric care label. Excess wrinkling, color transfer or odors may develop in items left in the washer after the cycle has ended.
- DO NOT force open the locked lid.
- For safety, the lid will remain locked for up to 6 minutes.
- For best results, follow fabric care label on items to be dried.
Operating the dryer
1. Prepare load for drying.
- Dry items of similar fabric, weight, and construction in the same load.
- Separate dark items from light-colored items. Separate items that shed lint from those that attract lint.
- Check for stains which may not have been removed in washing. Repeat stain removal process and wash again before drying.
- Place delicate or small items in a mesh bag (not included).
- Be sure buckles, buttons, and trim are heatproof and won’t damage the drum finish. Close zippers, buttons, hooks, and hook and loop fasteners. Tie strings and sashes to prevent snagging and tangling.
- Dryer heat may permanently set some stains.
2. Check that the lint filter is clean and in place.
- DO NOT operate dryer without lint filter in place.
- DO NOT operate dryer without cleaning the filter before use.
3. Load the dryer and close the door.
- Load items loosely. The average wet load will fill the drum 1/3 to 1/2 full. Items need room to tumble freely for even drying and less wrinkling.
- If desired, place a dryer fabric softener sheet on top of the load at the beginning of the cycle.
- When drying large items, dry only two or three items at a time. Fill out the load with smaller items.
- For delicate or very small loads, add two or three similar items to improve tumbling action.
- DO NOT overload the dryer.
4. Select the cycle and settings for each load.
- See Drying Cycle Selection and Drying Cycle Settings on the following pages.
- Over-drying can cause wrinkles, shrinkage, lint, harshness, and build up of static electricity.
- For best results, follow fabric care label on items to be dried.
5. Start the dryer.
- If drying a single large or bulky item, such as a comforter, remove the item part way through the cycle and turn it “inside out” to maximize drying effectiveness. Place item back in dryer and re-start cycle.
- See Drying Cycle Controls (Start, Pause, and Cancel) on the following pages.
- The dryer WILL NOT operate with the door open.
6. Remove items when cycle completes.
TIPS: Immediately hang or fold when the load is completed.
IMPORTANT: Always clean filter after each use.
Safe stain removal procedures
- Remove stains promptly.
- Follow the recommended treatment in the stain removal chart on the next page.
- To pretreat stains, use a prewash product, liquid detergent, or a paste made from powder detergent and water.
- Use cold water on unknown stains as hot water can set stains.
- Consult care label instructions for treatments to avoid on specific fabrics.
- Check for colorfastness by testing stain remover products on an inside seam.
- Rinse and wash items after stain removal.
WARNING: To reduce the risk of fire or serious injury to persons or property, comply with the basic warnings listed below:
- Read and comply with all instructions on stain removal products.
- Keep stain removal products in their original labeled containers and out of children’s reach.
- DO NOT combine stain removal products, especially ammonia and chlorine bleach. Dangerous fumes can result.
- Never wash items which have been previously cleaned in, washed in, soaked in or spotted with gasoline, dry cleaning solvents or other flammable or explosive substances because they give off vapors that could ignite or explode.
- Never use highly flammable solvents, such as gasoline, inside the home. Vapors can explode on contact with flames or sparks.
WARNING: DO NOT use or mix liquid chlorine bleach with other household chemicals such as toilet cleaners, rust removers, acids such as vinegar, or products containing ammonia. These mixtures can produce dangerous fumes which can cause serious injury or death.
CARE AND CLEANING
WARNING - FIRE HAZARD: A clothes dryer produces combustible lint. The dryer must be connected to an outdoors exhaust. Regularly inspect the outdoor exhaust opening and remove any accumulation of lint around the opening and in the surrounding area.
IMPORTANT Clean the lint filter after every load.
WARNING To reduce risk of fire or serious injury to persons or property, comply with the basic warnings listed in the Important Safety Information and in this Care and Cleaning section.
WARNING - FIRE HAZARD / HARMFUL VAPOR HAZARD Before cleaning the laundry center interior, unplug the electrical power cord to avoid electrical shock hazards.
Cleaning Inside of Dryer
- Clean the lint filter after every load. Lint build-up on the filter restricts air flow, which causes longer drying times. The filter is located at the bottom of the door opening. Remove by pulling straight up. Remove the lint and replace the filter.
- Occasionally a waxy build-up may form on the lint filter from using dryer-added fabric softener sheets. To remove this build-up, wash the filter with warm, soapy water. Dry the filter thoroughly and replace. DO NOT operate the dryer without the lint filter in place.
- If the dryer drum becomes stained from non colorfast fabrics, clean the drum with a damp cloth and a mild liquid household cleanser. Remove cleanser residue before drying the next load.
- Every 18 months a qualified service personnel should clean the dryer cabinet interior and exhaust duct. These areas can collect lint and dust over time. An excessive amount of lint build-up could result in inefficient drying and possible fire hazard.
Cleaning Inside of Washer
- Remove items from the washer as soon as the cycle ends. Excess wrinkling, color transfer, and odors may develop in items left in the washer.
- Dry the washer top, the area around the lid opening, and the underside of the lid. These areas should always be dry before the lid is closed.
- Before cleaning the washer interior, unplug the electrical power cord to avoid electrical shock hazards.
- When extremely soiled items have been washed, a dirty residue may remain on the tub. Remove this by wiping the tub with a nonabrasive household cleanser. Rinse thoroughly with water.
- The base plate or tub may become stained from fabric dye. Clean these parts with a nonabrasive household cleanser. This prevents dye transfer to future loads.
IMPORTANT: DO NOT store or place laundry products on top of laundry center at any time. They can damage the finish or controls.
Cleaning Outside of Laundry Center
- When washing is completed, wipe top and sides of laundry center with a damp cloth. Turn water faucets off to prevent pressure build-up in the hoses.
- Clean the cabinet with mild soap and water. Never use harsh, gritty or abrasive cleansers.
- If the cabinet becomes stained, clean with diluted chlorine bleach (1 part bleach to 8 parts water). Rinse several times with clear water.
- When cleaning chrome parts, it is best to use only a damp cloth.
- Remove glue residue from tape or labels with a mixture of warm water and mild detergent. Or, touch residue with the sticky side of tape.
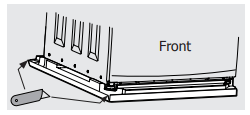
- Before moving the laundry center, place a strip of cardboard or thin fiberboard under the front leveling legs to prevent damage to the floor.
Winterizing Instructions
IMPORTANT: Winterize the laundry center if it is stored in an area where freezing can occur or moved in freezing temperatures to prevent damage to the washer:
- Turn off water supply faucets.
- Disconnect hoses from water supply and drain water from hoses.
- Plug electrical cord into a properly grounded electrical outlet.
- Add 1 gallon (3.8 L) nontoxic recreational vehicle (RV) antifreeze to empty wash drum. Close door.
- Select the rinse & spin cycle. Start the cycle and let the washer drain for 1 minute to drain out all the water. Not all of the RV antifreeze will be expelled.
- Stop the cycle, unplug electrical power cord, dry off tub interior, and close the lid.
- Store laundry center in an upright position.
- To remove antifreeze from washer after storage, run empty washer through a complete cycle using detergent. DO NOT add wash load.
TROUBLESHOOTING
Common washing inquiries
Blue stains
POSSIBLE CAUSES: Undiluted liquid detergent or fabric softener dispensed directly onto fabric.
- If caused by detergent, mix 1 cup (240 ml) white vinegar with 1 quart L) water in a plastic container. Soak item for hour, then rinse.
- If caused by fabric softener, rub with bar soap and rewash.
- Add detergent to empty tub. DO NOT pour on dry load.
- Avoid overfilling fabric softener compartment of dispenser.
Discoloration, graying
- Not enough detergent.
- Wash water temperature too low.
- Incorrect sorting.
- Rewash with correct amount of detergent and hottest water safe for fabric.
- Add bleach safe for fabric.
- Sort items by soil level and color.
- Use correct amount of detergent, hottest water, and bleach safe for fabric.
Greasy, oily stains
- Not enough detergent.
- Undiluted liquid fabric softener poured directly on fabric.
- Treat with prewash stain remover or liquid detergent.
- Increase detergent and water temperature, and rewash.
- Rub fabric softener stains with bar soap and rewash.
- Use correct amount of detergent and hottest water safe for fabric.
- DO NOT pour liquid fabric softener directly on fabric. See Washing Procedures.
Holes, tears, or snags
- Incorrect use of chlorine bleach.
- Unfastened zippers, hooks, and buckles.
- Rips, tears, and broken threads.
- Overloading the washer.
- Degradation of fabric.
SOLUTIONS: May be irreversible if rips, tears, and seams cannot be mended.
- DO NOT pour chlorine bleach directly on fabric.
- Check condition of items before washing. See Washing Procedures.
Lint
- Incorrect sorting.
- Tissues left in pocket.
- Overloading the washer.
- Not enough detergent.
- Undissolved detergent has left residue resembling lint.
- Static cling is attracting lint.
- Load washed too long.
- Reduce load size. Rewash using correct water temperature, water level, and amount of detergent.
- Add non precipitating water conditioner to wash water to remove detergent residue.
- Add fabric softener to final rinse.
- Dry load in dryer.
- Remove lint with lint brush or roller.
- See Washing Procedures, steps.
- DO NOT overload washer.
- Use correct temperature, amount of detergent, water, and wash time.
Pilling (Fibers ball up and cling to fabric)
POSSIBLE CAUSES: Pilling is normal with synthetic and permanent press fabrics due to abrasion from normal wear.
SOLUTIONS: Use a lint brush or shaver to remove pills.
- Use fabric softener in washer to lubricate fibers.
- When ironing, use spray starch or fabric finish on collars and cuffs.
- Turn items inside out to reduce abrasion.
Residue or powder on dark items; Stiff, harsh fabrics
- Undissolved detergent.
- Some granular detergents can combine with hard water minerals to form a residue.
- Overloading the washer.
SOLUTIONS: Rewash load.
- Increase water temperature using hottest water safe for fabric.
- DO NOT overload washer.
- Use liquid detergent or use non precipitating water conditioner with powder detergent
Unexpected washing results of large items
- Poor movement of large items during wash action.
- Large items loaded incorrectly in a flat fashion.
SOLUTIONS: Rearrange load and rewash.
- Add items one at a time, each tightly bunched into its own ball, to allow beneficial item interaction.
- Avoid loading items in a flat, laid-out fashion
Wrinkling
- Overloading the washer.
- Incorrect wash cycle for wash load.
- Reduce load size.
- Rinse in cold water with liquid fabric softener using the casual or delicate cycle.
- DO NOT overload washer.
- Remove items from washer as soon as cycle is completed.
- Use liquid fabric softener.
Yellow buildup of body soil on synthetic fabrics
- Agitation time too short.
- Water temperature too low.
- Not enough detergent.
- Soak in detergent booster or product containing enzymes.
- Wash in hottest water safe for fabric using casual cycle.
- Increase detergent.
- Add bleach safe for fabric or treat with color remover.
- Select correct wash cycle.
- Use correct amount of detergent.
- Wash synthetics frequently using hot or warm water.
Yellow or brown rust stains
- Iron or manganese in water supply, water pipes, or water heater.
- To restore discolored load of whites, use rust remover safe for fabric.
- DO NOT use chlorine bleach to remove rust stains. It may intensify discoloration.
- Use non precipitating water softener.
- Before washing, run hot water for a few minutes to clear lines.
- Drain water heater occasionally.
- For an ongoing problem, install iron filter in your water supply system.
Greasy, oily stains
POSSIBLE CAUSES: Use of fabric softener sheet.
SOLUTIONS: Rub fabric softener stains with bar soap. Rinse and rewash.
PREVENTIVE MEASURES: Add a few bath towels to small loads for proper tumbling.
- Some silk-like fabrics should be air dried.
- Use proper drying temperature.
- Place fabric softener sheet in load before starting the dryer.
Lint
- Overloading the dryer.
- Overdrying causes static electricity.
- Lint filter not clean when cycle began.
- Lint attached to pills.
- Reduce load size and rewash using liquid fabric softener in the final rinse.
- Add a fabric softener sheet and tumble with no heat.
- Use lint brush or roller to remove lint.
- DO NOT overload dryer.
- Use fabric softener in washer or dryer to reduce static electricity.
- Remove items when slightly damp to avoid overdrying.
- Check that lint filter is clean and in place.
Pilling (Fibers break off, ball up and cling to fabric)
POSSIBLE CAUSES: Overdrying.
SOLUTIONS: Use a lint brush or shaver to remove pills.
- Use fabric softener to lubricate fibers.
- If ironing, use spray starch or fabric finish on collars and cuffs.
- Turn items inside out to reduce abrasion.
Shrinking
- Temperature too high.
- Overdrying.
SOLUTIONS: Irreversible condition.
- Follow fabric care label directions.
- If shrinking is a concern, check load often.
- Remove items while slightly damp and hang or lay flat to complete drying.
- Block knits into shape.
Wrinkling
- Overloading the dryer.
- Leaving items in dryer after cycle ends.
- Reduce load size and tumble at medium or low heat for 5-10 min.
- Remove items immediately. Hang or fold.
- DO NOT overload dryer.
- Remove items as soon as cycle ends.
Before Calling
NOISE
Rattling and clanking noise
- Foreign objects such as coins or safety pins may be in drum or pump.
- Stop washer and check drum. If noise continues after washer is restarted, objects may be in pump. Call your authorized service provider.
- To prevent unnecessary noise and damage to tub, fasten fasteners and turn items inside out.
- Heavy wash loads may produce a thumping sound. This is usually normal. If sound continues, washer may be out of balance.
- Stop washer and redistribute wash load.
- Washer is not resting firmly on floor.
- Move washer so it rests firmly on floor. Adjust leveling legs. See Installation Instructions for details.
- Stop washer and rearrange wash load.
OPERATING
Washer does not start
- Washer lid is open.
- Close washer lid. Washer will not operate when the lid is open.
- Make sure plug fits tightly in wall outlet.
- Reset circuit breaker or replace fuse. DO NOT increase fuse capacity. If problem is a circuit overload, have it corrected by a qualified electrician. If problem is a power outage, call local electric company.
- Turn on water supply faucets.
- Wait for the motor to cool down before attempting to restart.
Washer won’t spin
- Lid is not completely closed.
- Close washer lid. The washer will not operate when the lid is open.
Residue left in drum
- Heavily soiled items.
- Wipe drum with a nonabrasive household cleanser, then rinse. Shake or brush excess dirt and sand from items before washing.
Dryer does not start